Screen Capture for Windows 10: Best Methods Compared
Let's be honest - you've probably needed to grab a screenshot on your Windows 10 machine more times than you can count. Whether you're documenting a bug for IT support, creating training materials for your team, or just saving that recipe you found online, knowing how to capture what's on your screen is essential. The good news? Windows 10 comes packed with multiple ways to handle screen capture, from quick keyboard shortcuts to full-featured tools with editing capabilities. But which method should you actually use? Let's dive into the options and figure out what works best for different situations.
Built-In Tools vs. Keyboard Shortcuts
When it comes to screen capture for Windows 10, you've got two main categories of built-in options: dedicated tools with interfaces and quick keyboard shortcuts. Each has its place in your workflow.
The Classic Print Screen Approach
The Print Screen (PrtScn) button has been around forever, and it's still the fastest way to capture your entire screen. Here's what you need to know:
- PrtScn alone: Copies your full screen to the clipboard
- Alt + PrtScn: Grabs just the active window
- Windows + PrtScn: Captures the full screen AND saves it automatically to Pictures > Screenshots
The beauty of keyboard shortcuts for taking screenshots is their speed. No menus, no waiting - just press and you're done. But there's a catch: you can't select specific areas, and you'll need to paste the image somewhere to actually see or edit it.
Snipping Tool - The Middle Ground
Microsoft's Snipping Tool gives you more control without being overwhelming. It's been around since Windows Vista, and it's pretty straightforward to use.
| Feature | Capability | Best For |
|---|---|---|
| Rectangular Snip | Select any rectangular area | Grabbing specific sections of a page |
| Free-form Snip | Draw any shape around what you want | Irregular content areas |
| Window Snip | Capture a specific window | Documenting application interfaces |
| Full-screen Snip | Grab everything | Quick full captures with editing |
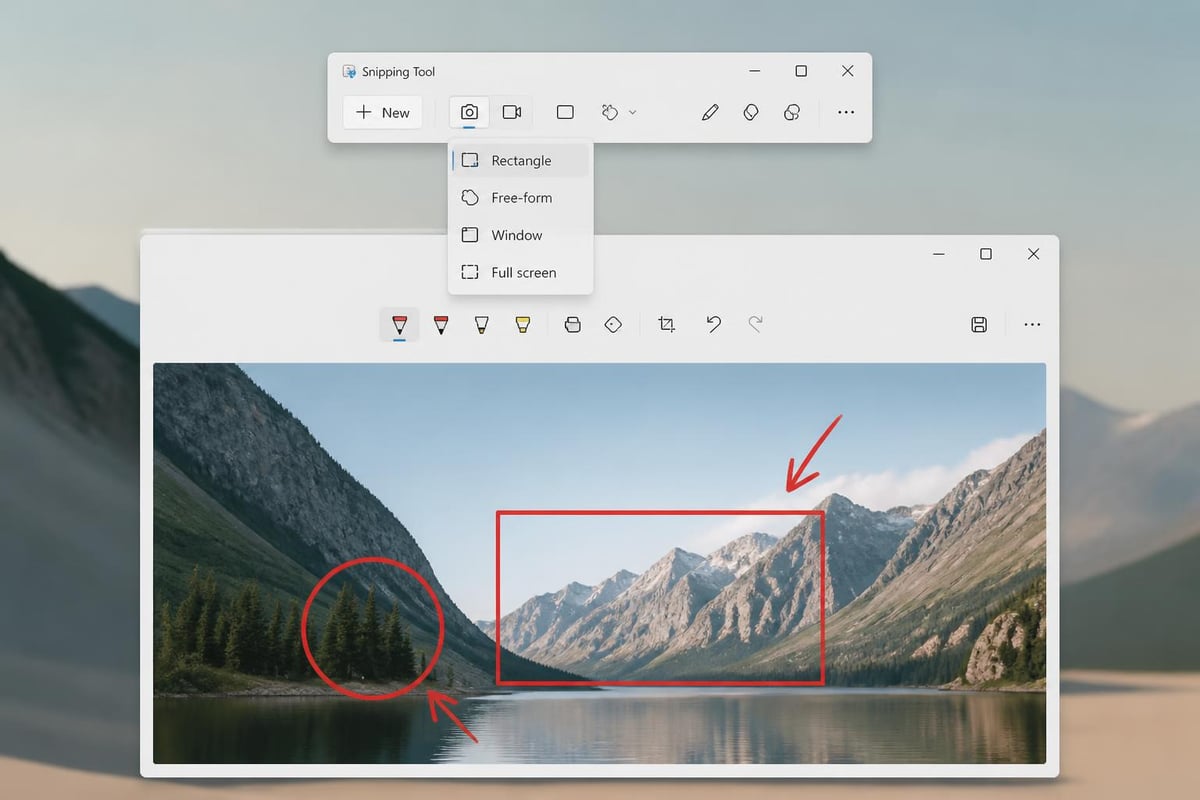
You can launch Snipping Tool by searching for it in the Start menu, and it lets you annotate right away with a pen or highlighter. The Snipping Tool from Microsoft also includes a delay timer, which is super handy when you need to capture dropdown menus or tooltips.
Snip & Sketch - The Modern Alternative
Windows 10 introduced Snip & Sketch as the eventual replacement for Snipping Tool, and honestly, it's a pretty solid upgrade. You can access it by pressing Windows + Shift + S, which dims your screen and lets you choose your capture mode right away.
The moment you hit that keyboard combo, you get a small toolbar at the top with four options:
- Rectangular snip
- Freeform snip
- Window snip
- Fullscreen snip
What sets Snip & Sketch apart is what happens after you capture. Your screenshot automatically goes to your clipboard AND pops up a notification. Click that notification, and you're taken to a decent editing interface where you can:
- Crop and rotate
- Draw with different colored pens
- Add highlights
- Type text directly on the image
- Use a ruler for straight lines
The annotation features in Snip & Sketch make it perfect for creating quick tutorials or marking up feedback. Plus, there's a built-in share button that connects to your Windows share menu.
When to Use Each Tool
Here's the thing - both Snipping Tool and Snip & Sketch exist in Windows 10, which can be confusing. Microsoft keeps saying they'll remove Snipping Tool, but it's still hanging around in 2026.
Choose Snipping Tool if:
- You prefer launching a program from the Start menu
- You want a delay timer that's easier to access
- You're used to the older interface
Choose Snip & Sketch if:
- You love keyboard shortcuts
- You want more modern editing tools
- You need to share screenshots quickly through Windows sharing
Game Bar - Not Just for Gamers
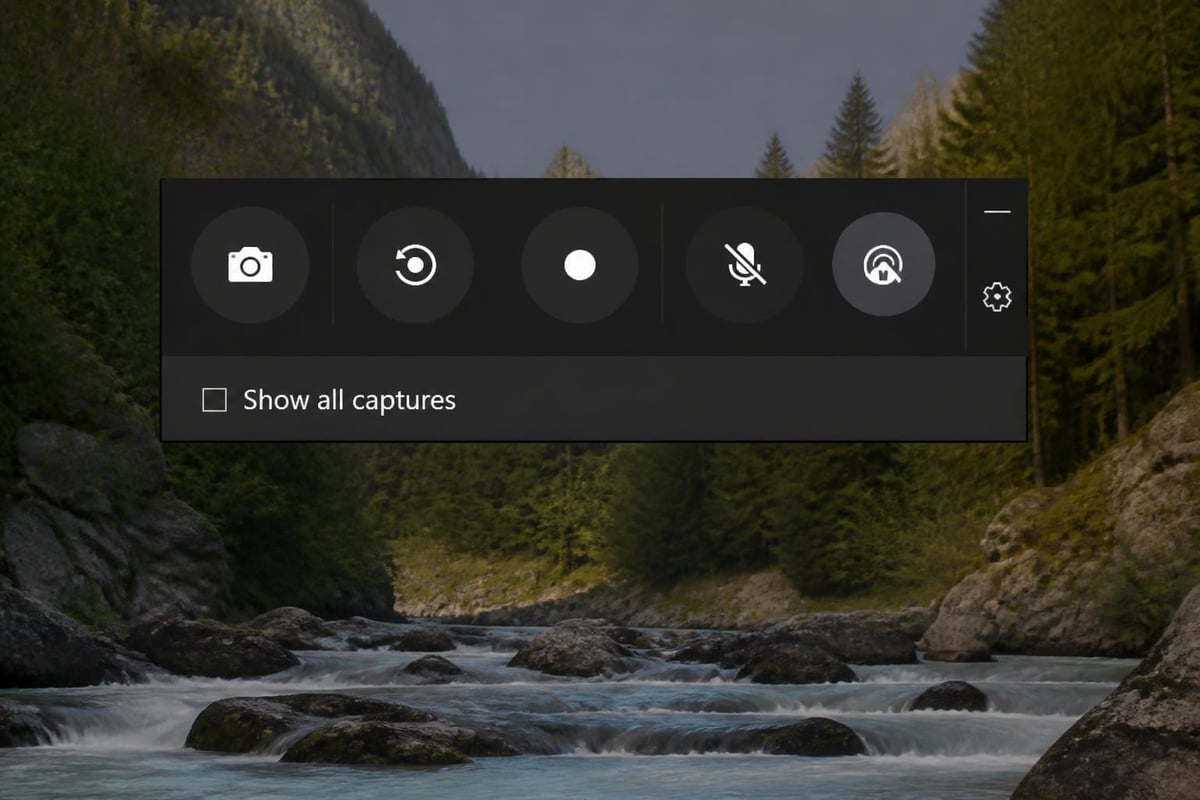
Here's a screen capture for Windows 10 option you might not know about: the Xbox Game Bar. Press Windows + G, and boom - you've got a recording and screenshot tool that's actually pretty powerful.
Sure, it was designed for capturing gameplay, but it works with any application. The Game Bar gives you:
- Quick screenshot button (Windows + Alt + PrtScn)
- Screen recording capabilities
- Audio recording options
- Performance monitoring widgets
The screenshots automatically save to Videos > Captures, which is a bit odd, but you get used to it. What makes Game Bar interesting is that it can capture full-screen applications that other tools sometimes miss, especially games and video players.
Third-Party Tools Worth Considering
While Windows 10's built-in options cover most bases, sometimes you need more firepower. Third-party screen capture tools add features that Microsoft's offerings just don't have.
What Third-Party Tools Bring to the Table
Advanced editing capabilities:
- Blur sensitive information
- Add arrows and callouts
- Insert numbered steps
- Apply professional effects
Better organization:
- Automatic naming conventions
- Custom save locations
- Tag and categorize screenshots
- Search through your capture library
Cloud integration:
- Instant uploads to your preferred service
- Shareable links generated automatically
- Team collaboration features
- Version control
If you're capturing screens regularly for work, especially creating documentation or training materials, dedicated tools can save you tons of time. Some popular options include ShareX, Greenshot, and Lightshot - each with their own strengths.
For teams that need to go beyond static screenshots, tools like Mool extend the concept further by letting you record, share, and review screen recordings directly from your browser, with the bonus of AI-powered searchability across your video library.
Comparing Methods Side by Side
Let's break down the main screen capture for Windows 10 methods so you can quickly pick the right one:
| Method | Speed | Editing | Flexibility | Best Use Case |
|---|---|---|---|---|
| Print Screen | Fastest | None | Low | Quick copies for pasting |
| Windows + PrtScn | Very Fast | None | Low | Rapid full-screen saves |
| Snipping Tool | Medium | Basic | Medium | Delayed captures with simple edits |
| Snip & Sketch | Fast | Good | High | Modern workflow with annotations |
| Game Bar | Fast | None | Medium | Full-screen apps and recordings |
| Third-Party Tools | Varies | Excellent | Very High | Professional documentation |
Think about your typical workflow. Are you grabbing quick screenshots to paste into emails? Print Screen is your friend. Need to annotate and share? Snip & Sketch has you covered. Creating professional documentation? Might be time to explore third-party options.
Tips for Better Screen Captures
You've got the tools figured out, but here's how to actually use them effectively:
Clean Up Your Screen First
Nobody wants to see your messy desktop or seventeen browser tabs. Before you capture:
- Close unnecessary windows
- Hide your taskbar if it's not relevant (Auto-hide in settings)
- Clear notifications from the system tray
- Use a clean wallpaper for professional shots
Think About Resolution
Your screen capture for Windows 10 will be at your display's native resolution. If you're sharing with others who might have different screen sizes, consider:
- Capturing at a standard resolution like 1920x1080
- Testing how your screenshots look on different devices
- Cropping to show only the relevant parts
- Using zoom features to highlight specific details
File Format Matters
Windows defaults to PNG for most capture methods, which is great for quality but creates larger files. Here's when to use what:
- PNG: Screenshots with text, diagrams, or anything that needs to stay crisp
- JPEG: Photos or screenshots with lots of colors where file size matters
- GIF: Simple animations or very small file size needs
Troubleshooting Common Issues
Even with all these options, sometimes screen capture for Windows 10 doesn't work quite right. Let's fix the most common problems.
Print Screen Not Working
If PrtScn does nothing when you press it:
- Check if you need to hold Fn + PrtScn on laptop keyboards
- Make sure OneDrive isn't intercepting the shortcut (check Settings > Backup > Folders)
- Try updating your keyboard drivers
- Restart Windows Explorer from Task Manager
Snip & Sketch Won't Launch
When Windows + Shift + S doesn't respond:
- Open Settings > Apps > Apps & features
- Find "Snip & Sketch" and click Advanced options
- Reset the app
- Restart your computer
Screenshots Are Dark or Corrupted
This usually happens with hardware acceleration in certain apps. Microsoft's official troubleshooting guide recommends temporarily disabling hardware acceleration in the problematic application before capturing.
Organizing Your Screenshots
Once you start using screen capture for Windows 10 regularly, you'll accumulate a lot of images. Here's how to stay organized without losing your mind:
Create a system:
- Set up folders by project or date
- Use descriptive filenames (not "Screenshot_2026_05_07_001")
- Delete screenshots you don't need immediately
- Consider a naming convention like ProjectName_Description_Date
Windows 10 makes this easier with:
- The ability to change default save locations in each tool's settings
- Quick access folders in File Explorer
- Search functionality that reads text in images (if you have Windows 10 version 2004 or later)
You can also leverage cloud storage like OneDrive or Google Drive to automatically backup your Screenshots folder, ensuring you never lose important captures.
Accessibility Features for Screen Capture
Windows 10 includes some helpful accessibility options that make screen capture easier for everyone:
- Narrator can announce when screenshots are taken
- Magnifier helps you precisely select capture areas
- High contrast mode makes the Snip & Sketch interface more visible
- On-screen keyboard lets you trigger shortcuts without a physical keyboard
These features are especially useful when creating training materials or documentation that need to be accessible to diverse audiences.
Security and Privacy Considerations
Before you start screen capturing everything, remember that screenshots can contain sensitive information:
Always check for:
- Personal email addresses or phone numbers
- Passwords or security questions
- Financial information
- Confidential business data
- Other people's private information
Many comprehensive Windows screenshot guides emphasize this, but it's worth repeating: once you share a screenshot, you can't take it back. Consider using annotation tools to blur or cover sensitive areas before sharing.
If you're working with truly confidential information, check your organization's policies about screen captures and sharing. Some industries have strict regulations about documenting and distributing screen content.
Quick Reference Guide
Here's your cheat sheet for screen capture for Windows 10:
| What You Need | Best Method | Shortcut |
|---|---|---|
| Full screen, no save | Print Screen | PrtScn |
| Full screen, auto-save | Windows Print Screen | Win + PrtScn |
| Active window only | Alt Print Screen | Alt + PrtScn |
| Custom area with editing | Snip & Sketch | Win + Shift + S |
| Delayed capture | Snipping Tool | Search "Snipping Tool" |
| Gaming/full-screen apps | Game Bar | Win + G, then capture |
Keep this handy, and you'll never waste time hunting for the right tool again. The key is picking the method that matches your immediate need rather than always defaulting to the same one.
Mastering screen capture for Windows 10 doesn't have to be complicated - it's all about knowing which tool fits your situation. Whether you're using quick keyboard shortcuts for speed or diving into Snip & Sketch for annotation, Windows 10 gives you plenty of options. But when you need to level up from static screenshots to dynamic screen recordings that teams can search, review, and learn from, that's where Mool comes in. Give it a try and transform how you capture and share knowledge across your organization.