How to Screen Record on Mac: Complete 2026 Guide
If you're working on a Mac and need to capture what's happening on your screen, you're in luck. Apple's macOS comes packed with powerful built-in tools that make screenrecording on mac incredibly straightforward. Whether you're creating a tutorial, documenting a bug, or saving a video call, knowing how to efficiently record your screen is a game-changer. Let's walk through everything you need to know about capturing your Mac's display in 2026.
Why Screen Recording Matters More Than Ever
Screen recording has evolved from a niche technical skill to an everyday necessity. We're all working remotely, collaborating across time zones, and communicating through async video. Capturing your screen lets you show rather than tell, which saves everyone time and confusion.
Think about it. Instead of writing a ten-paragraph email explaining how to update a spreadsheet, you can record a 60-second video walking someone through the steps. Instead of trying to describe that weird software glitch, you can show it happening in real-time. That's the power of screen recording.
For professionals, educators, and content creators, screen recordings have become essential communication tools. You can create onboarding materials, provide feedback on designs, demonstrate software features, or build entire courses. The applications are practically endless.
The Built-In Screenshot App: Your Go-To Tool
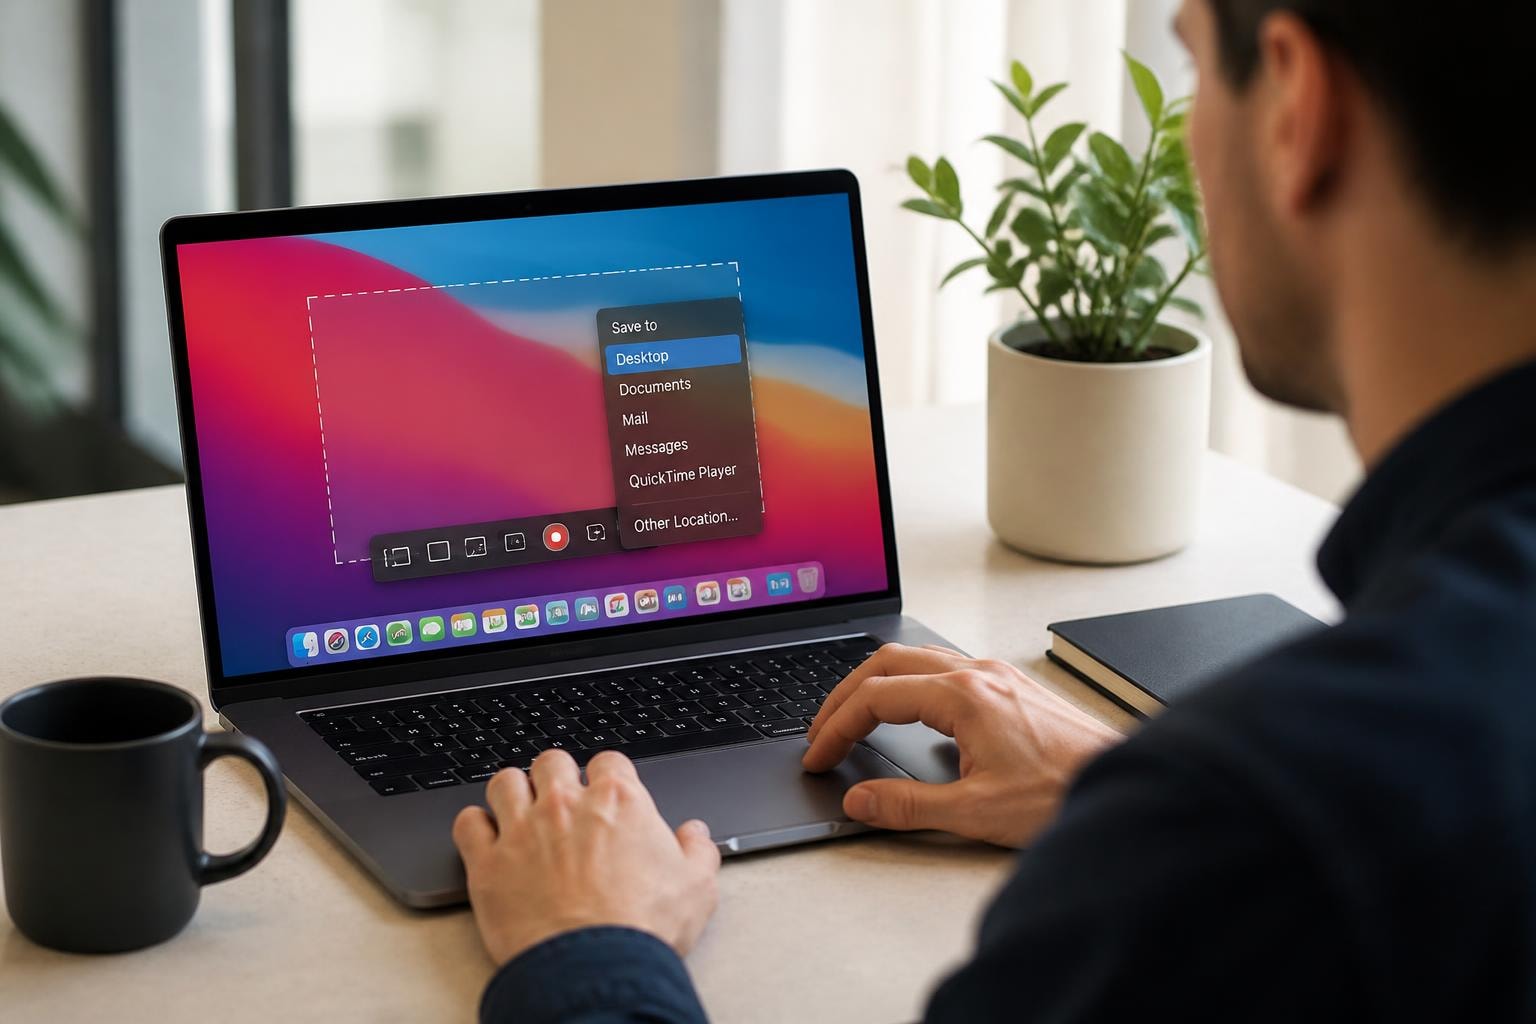
Apple's Screenshot app (previously called Grab) is your main weapon for screenrecording on mac. It's free, already installed, and surprisingly powerful for most recording needs.
How to Launch the Screenshot App
You've got several ways to fire up the Screenshot app:
- Press Shift + Command + 5 simultaneously (the fastest method)
- Open Spotlight with Command + Space, type "Screenshot," and hit Enter
- Navigate to Applications > Utilities > Screenshot
The keyboard shortcut is definitely the quickest route once you've memorized it. Apple's official guide provides additional details on these methods if you want to dive deeper.
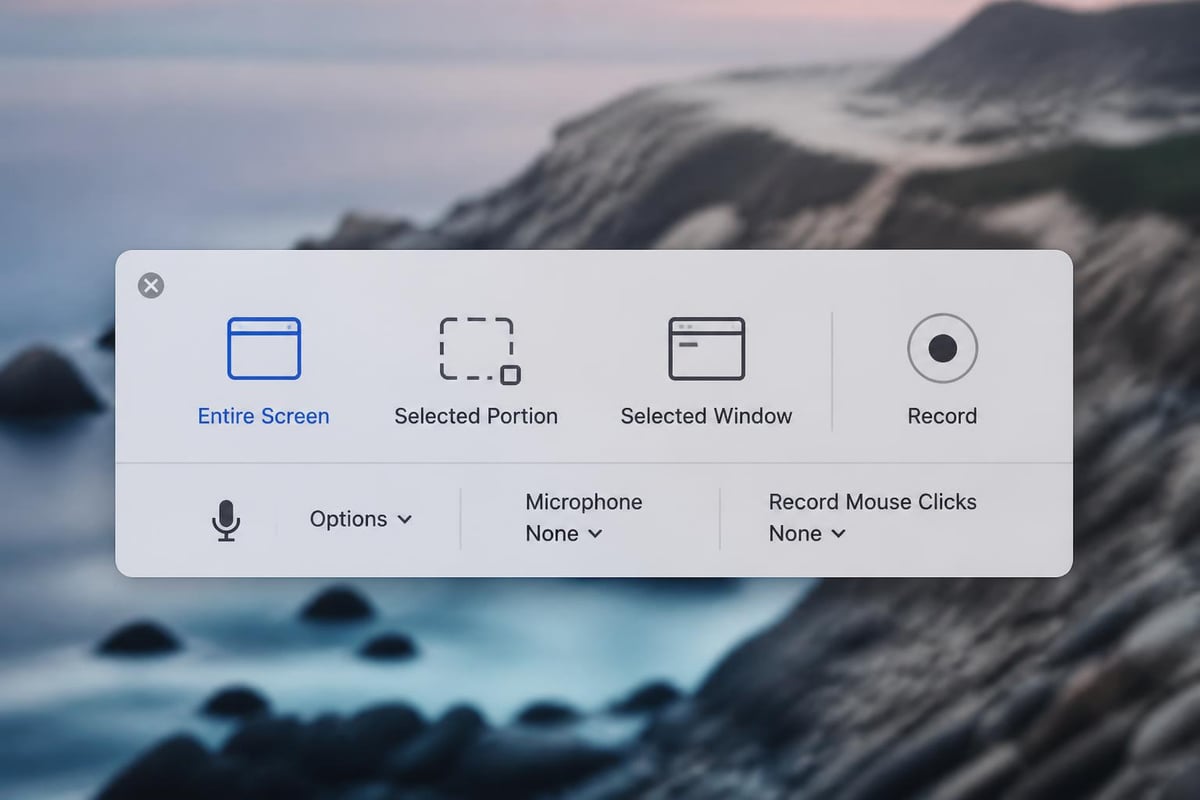
Recording Options Explained
When you launch the Screenshot app, you'll see a floating toolbar with several icons. The last three are for screen recording:
- Record Entire Screen: Captures everything visible on your display
- Record Selected Portion: Lets you drag to select a specific area
- Record Selected Window: Click any window to record just that application
Below the main icons, you'll find the Options menu. This is where the magic happens. You can choose which microphone to use, whether to show mouse clicks in the recording, where to save your file, and set a timer delay.
The timer option is particularly handy when you need to set up something before recording starts. You can choose a 5 or 10-second delay, giving you time to open menus or navigate to the right screen.
Starting and Stopping Your Recording
Once you've configured your settings, click the Record button. For entire screen recording, you'll see a small icon in the menu bar indicating the recording is active. For selected portions, you'll see a "Stop" button floating on your screen.
When you're done, click the Stop button in the menu bar or press Command + Control + Esc. Your recording saves automatically to your chosen location (Desktop by default).
QuickTime Player: The Advanced Alternative
QuickTime isn't just for watching videos. It's actually a capable screen recording tool that offers more flexibility than the Screenshot app in certain scenarios, as explained in Macworld's comprehensive guide.
Setting Up QuickTime for Screen Recording
Open QuickTime Player from your Applications folder. Instead of opening a video file, go to File > New Screen Recording. You'll see a simple recording window pop up.
Click the small arrow next to the record button to access settings. Here you can choose your microphone source and decide whether to show mouse clicks in the recording. These options mirror what's available in the Screenshot app.
| Feature | Screenshot App | QuickTime Player |
|---|---|---|
| Keyboard shortcut access | Yes (Shift+Cmd+5) | No |
| Record selected portion | Yes | Yes (click and drag) |
| Record specific window | Yes | No |
| Audio input selection | Yes | Yes |
| Built-in trimming | No | Yes |
| File format options | MOV | MOV |
The main advantage of QuickTime is its built-in editing capabilities. After recording, you can immediately trim your video, split clips, or rotate footage without opening another application.
Capturing Audio: The Tricky Part
Here's where screenrecording on mac gets interesting. macOS makes it super easy to record your microphone input, but capturing system audio (the sounds coming from your computer) requires a workaround.
Recording Your Microphone
This one's straightforward. In either the Screenshot app or QuickTime Player, select your built-in microphone or external mic from the microphone dropdown menu. When you record, your voice will be captured along with the visuals.
The System Audio Challenge
macOS doesn't natively support recording internal audio for privacy and security reasons. If you want to capture both your screen and the sounds playing through your speakers, you'll need third-party software like BlackHole or Loopback.
These apps create a virtual audio device that routes your system audio so recording apps can access it. It's a bit technical to set up, but once configured, it works seamlessly. 9to5Mac's guide covers this process in detail.
For most business use cases, though, microphone recording is sufficient. You're typically narrating what's happening on screen rather than capturing system sounds.
Pro Tips for Better Screen Recordings
Now that you know the basics of screenrecording on mac, let's level up your technique with some professional touches.
Optimize Your Settings Before Recording
Before you hit that record button, take a minute to prepare:
- Close unnecessary applications to reduce visual clutter and improve performance
- Turn off notifications (System Settings > Notifications > Do Not Disturb)
- Hide your desktop icons if you're recording the full screen
- Increase your display resolution for sharper recordings
- Test your audio levels to ensure you're not too quiet or distorting
These small steps make a huge difference in the final product's quality. Nobody wants to watch a tutorial interrupted by Slack notifications every thirty seconds.
Choose the Right Frame Rate and Quality
Most Mac screen recordings default to 60 frames per second, which is excellent for smooth motion. However, if you're recording simple tutorials with mostly static content, 30 fps works fine and produces smaller file sizes.
You can't directly change the frame rate in Screenshot app or QuickTime, but third-party tools offer this flexibility. Consider your use case. High-motion gaming content benefits from 60 fps, while a spreadsheet tutorial doesn't need it.
Plan Your Content Structure
The difference between amateur and professional screen recordings often comes down to planning. Before recording:
- Write a brief outline of what you'll demonstrate
- Practice your narration to avoid excessive "umms" and pauses
- Prepare any files or websites you'll need in advance
- Clean up your browser tabs to show only what's relevant
A 5-minute planning session can save you 30 minutes of editing later. Trust me on this one.
Managing and Sharing Your Recordings
You've captured the perfect screen recording. Now what? Let's talk about file management and sharing strategies.
Where Your Files Live
By default, macOS saves screen recordings to your Desktop with the filename format "Screen Recording [date] at [time].mov". These files can get large quickly, especially for longer recordings.
I recommend creating a dedicated folder for screen recordings. You can change the default save location in the Screenshot app's Options menu. Something like Documents > Screen Recordings keeps everything organized.
File Size Considerations
MOV files from Mac screen recordings aren't particularly compressed. A 10-minute full-screen recording at 1080p can easily hit 1-2 GB. This matters when you're trying to share files.
For sharing through email or messaging apps with file size limits, you might need to compress your video. macOS's built-in compression isn't great, but third-party apps like HandBrake can reduce file sizes by 70-80% without noticeable quality loss.
Alternatively, upload to cloud storage and share a link instead of the actual file. This works better for larger recordings and doesn't clog up anyone's inbox.
Quick Editing Without Extra Software
Both QuickTime Player and the Photos app (yes, Photos!) can handle basic editing of screen recordings:
- Trimming: Cut unwanted footage from the beginning or end
- Rotating: Fix orientation if needed
- Splitting: Divide one recording into multiple clips
- Combining: Merge several recordings into one file
For anything more sophisticated, you'll need dedicated video editing software. But for quick fixes, these built-in tools are surprisingly capable.
Advanced Techniques for Power Users
If you're frequently creating screen recordings for professional purposes, these advanced strategies will save you time and improve your output quality.
Using Third-Party Screen Recording Software
While macOS's built-in tools are great for basic needs, professional screen recorders offer features that take your recordings to the next level. According to TechRadar's review, several excellent options exist for Mac users.
These tools typically provide:
- Scheduled recordings that start automatically
- Webcam overlay to show your face while recording
- Advanced annotation tools for drawing on-screen during recording
- Custom watermarks for branding
- Direct upload to YouTube, Vimeo, or cloud storage
For teams collaborating on video content, tools like Mool offer browser-based recording with AI-powered searchability, making it easy to find specific moments in your recordings later. This becomes invaluable when you're managing dozens or hundreds of training videos.
Keyboard Shortcuts That Save Time
Beyond the basic Shift + Command + 5, several keyboard shortcuts enhance your screenrecording on mac workflow:
- Command + Control + Esc: Stop any active screen recording
- Shift + Command + 3: Take a full screenshot (useful for thumbnails)
- Shift + Command + 4: Take a partial screenshot
- Spacebar (after Shift+Cmd+4): Switch to window screenshot mode
Memorizing these shortcuts transforms screen recording from a deliberate process into muscle memory. You'll save seconds on each recording, which adds up to hours over time.
Creating Templates and Presets
If you're recording similar content repeatedly, create templates to streamline your workflow. This might include:
- Standard intro and outro clips you can append to recordings
- Preset audio settings saved in your recording software
- Document templates you'll display on-screen
- Browser bookmark folders with frequently demonstrated websites
The idea is to eliminate repetitive setup work. Build your templates once, then reuse them dozens of times.
Troubleshooting Common Issues
Even with straightforward tools like macOS's screen recorders, you'll occasionally run into problems. Here are solutions to the most common headaches.
No Audio in Recordings
This is probably the most frequent complaint. If your screen recording has no sound:
- Check that you've selected a microphone in the recording options
- Verify your microphone isn't muted in System Settings > Sound
- Make sure the app you're recording from has microphone permissions
- Test your microphone in another app to confirm it's working
For the detailed process, How-To Geek's tutorial walks through audio troubleshooting step-by-step.
Choppy or Laggy Recordings
If your recordings are stuttering or dropping frames:
- Close other applications to free up system resources
- Reduce the recording area (record a portion instead of full screen)
- Check your storage space (low disk space affects performance)
- Restart your Mac if it's been running for days
- Update macOS to the latest version for performance improvements
Older Macs with less RAM particularly struggle with high-resolution full-screen recordings. Recording a portion of your screen reduces the processing load significantly.
Permission Errors
Sometimes macOS will block screen recording apps for security reasons. You'll see an error message about screen recording permissions.
Fix this by going to System Settings > Privacy & Security > Screen Recording. Make sure the app you're using (Screenshot, QuickTime, or third-party software) has a checkmark next to it. You'll need to restart the app after granting permission.
Screenrecording on Mac for Different Use Cases
Different scenarios call for different approaches to screen recording. Let's break down strategies for common situations.
Tutorial and How-To Videos
When creating instructional content, clarity is everything. Use these techniques:
- Record in chunks rather than one long take (easier to edit and redo mistakes)
- Zoom in on important details by recording a selected portion
- Speak slowly and clearly, pausing between major steps
- Use your cursor deliberately to draw attention to specific elements
- Include text callouts in editing to reinforce key points
For step-by-step guides, a browser-based screen recorder can simplify the workflow since you're often demonstrating web-based tools.
Bug Reports and Technical Issues
When documenting software problems for support teams:
- Start recording before triggering the bug to capture the entire sequence
- Show mouse clicks in recording options to demonstrate your actions
- Verbally describe what you're doing as you do it
- Include relevant system information in the video or accompanying notes
- Keep recordings focused on the specific issue (under 2 minutes if possible)
Technical teams appreciate concise, clear bug reports that show exactly how to reproduce the issue.
Presentation Recording
Recording presentations or demos requires a slightly different approach:
| Consideration | Best Practice |
|---|---|
| Screen content | Use presenter mode to hide notes |
| Audio setup | Use quality microphone, test levels |
| Pacing | Speak more slowly than in-person |
| Visual aids | Increase font sizes for readability |
| Length | Break into 10-15 minute segments |
| Backup | Record locally even if using Zoom/Teams |
If you're recording a live presentation, consider running a backup recording locally while presenting. Cloud meeting recordings sometimes fail, and you don't want to lose your content.
Content Creation and Social Media
For YouTube, TikTok, or Instagram content involving screen recordings:
- Record in the correct aspect ratio for your platform (16:9 for YouTube, 9:16 for Stories)
- Plan engaging intros and hooks in the first 3 seconds
- Add visual interest with zooms, highlights, and cuts
- Include captions since many viewers watch without sound
- Export in platform-optimized formats for best quality
Social media content demands higher production value than internal business videos. Invest time in post-production editing.
Security and Privacy Considerations
When you're screenrecording on mac, especially in professional settings, privacy matters. Here's what to watch out for.
What Not to Record
Before hitting record, scan your screen for:
- Personal information (addresses, phone numbers, social security numbers)
- Passwords and API keys visible in code or settings
- Confidential company data in spreadsheets or documents
- Private messages in Slack, email, or messaging apps
- Financial information in banking or payment applications
One careless recording can create serious security issues. Always review your screen before recording, and watch the playback before sharing.
Protecting Your Recordings
Once you've created a recording:
- Store sensitive recordings in encrypted folders
- Use password-protected sharing when distributing files
- Delete recordings when they're no longer needed
- Avoid cloud storage for highly confidential content
- Verify recipient identity before sharing
Your recordings are data, and data requires protection. Treat screen recordings with the same security mindfulness you'd apply to sensitive documents.
Respecting Others' Privacy
If your screen recording includes video calls or other people:
- Get permission before recording others
- Announce when recording at the start of calls
- Blur faces if sharing publicly without consent
- Respect company policies about recording meetings
- Follow legal requirements in your jurisdiction
Some states and countries require two-party consent for recordings. Know the rules that apply to your situation.
Workflow Integration and Productivity
The real power of screenrecording on mac comes when you integrate it into your daily workflows. Here's how to make screen recording a natural part of how you work.
Building a Recording Habit
Start small. Identify one recurring task where a screen recording would save time:
- Weekly team updates
- Client onboarding
- Bug reporting
- Process documentation
- Training new employees
Record it once, share it many times. The initial time investment pays dividends when you can reuse that recording instead of repeating the same explanation.
Creating a Knowledge Base
Screen recordings make excellent additions to company knowledge bases. Instead of written documentation that becomes outdated, video shows exactly how things work.
Organize recordings by:
- Department or team (Marketing, Engineering, Sales)
- Process type (Onboarding, Training, Troubleshooting)
- Software or tool (Salesforce, Slack, internal systems)
- Creation date (to identify outdated content)
Adding searchable transcripts makes your video library even more valuable. Tools with AI-powered search let team members find specific information within hours of recordings instantly, as shown in the features of modern recording platforms.
Async Communication Excellence
Screen recordings revolutionize async work. Instead of scheduling meetings across time zones, record your thoughts and send them when convenient.
Best practices for async video communication:
- Keep recordings under 5 minutes (attention spans are short)
- Front-load the key information in case people don't watch entirely
- Provide timestamps in accompanying text for long recordings
- Be conversational but concise in your narration
- Include clear next steps or calls to action
This approach respects everyone's time and creates a permanent record of decisions and discussions.
Mastering screenrecording on mac isn't complicated once you understand the built-in tools and develop good habits. Whether you're using the Screenshot app for quick captures or QuickTime for more control, you've got everything you need to create professional recordings right out of the box. If you're looking to take your screen recording workflow to the next level with AI-powered search, instant sharing, and collaborative review features, Mool transforms simple recordings into a searchable knowledge base that makes your video content actually work for your team.