Recording in Windows 10: Your Complete Guide (2026)
Recording your screen on Windows 10 has become essential for creating tutorials, documenting bugs, sharing gameplay, and collaborating with remote teams. Whether you're explaining a process to colleagues or capturing memorable gaming moments, knowing how to use the recording tools built into your operating system can save you time and money. In this guide, we'll walk through everything you need to know about recording in Windows 10, from the native Xbox Game Bar to alternative solutions that might better fit your workflow.
Getting Started with Xbox Game Bar
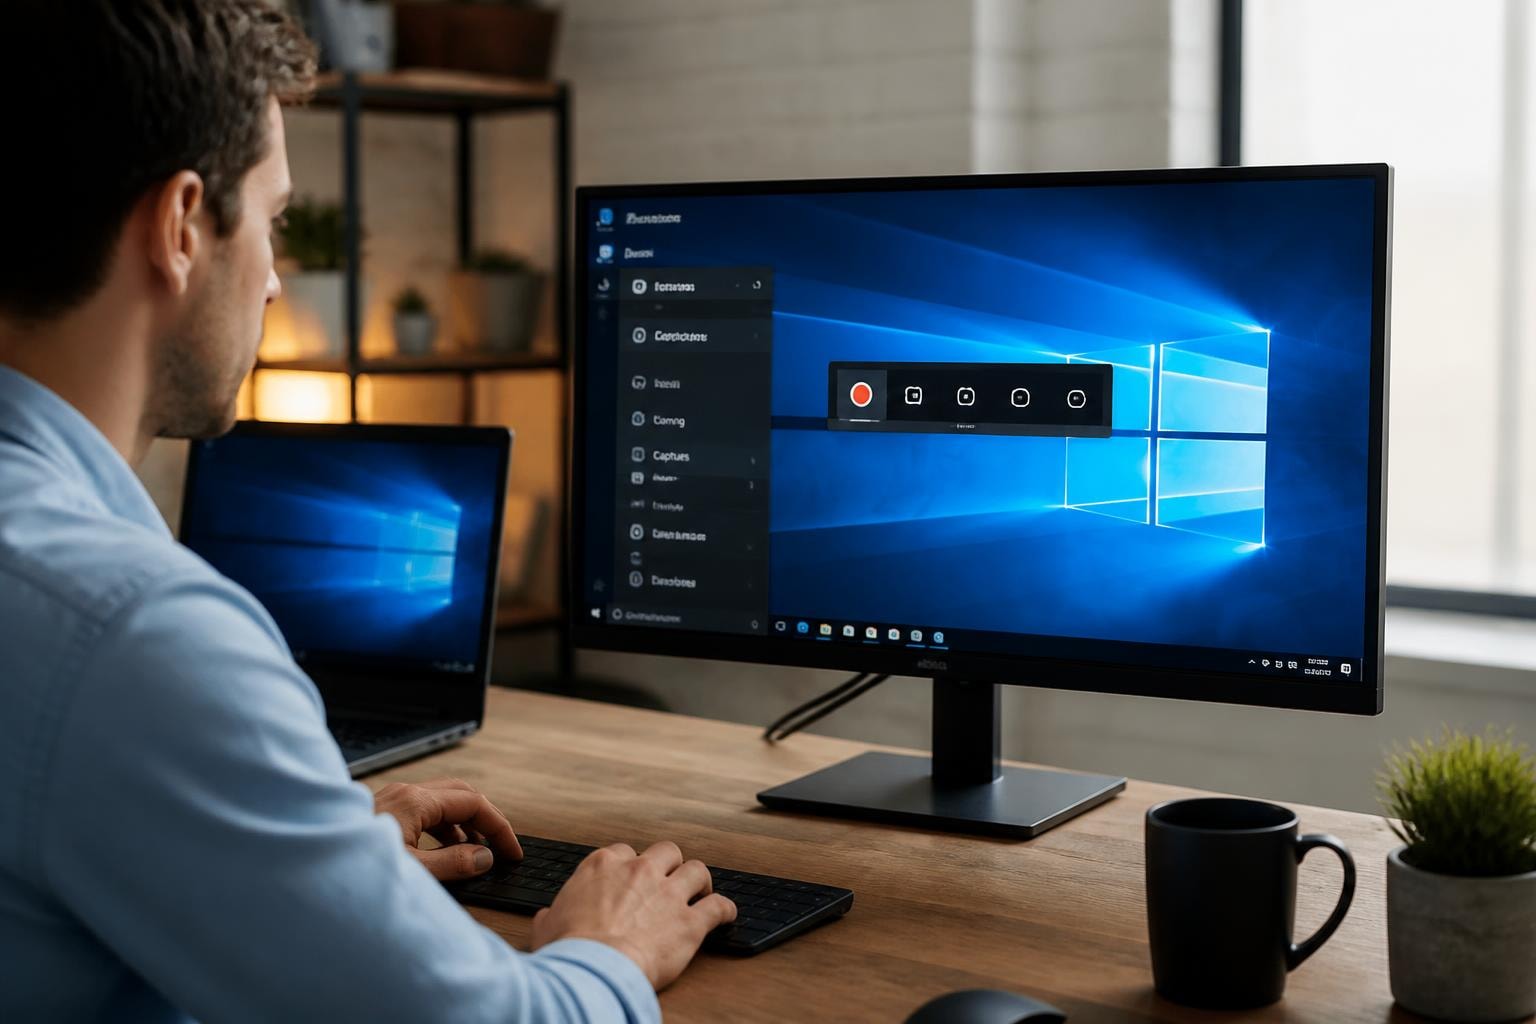
The Xbox Game Bar is Microsoft's built-in solution for recording in Windows 10, and it's already installed on your computer. Originally designed for gamers, this tool has evolved into a versatile screen capture utility that works with most applications.
To activate the Xbox Game Bar, simply press Windows Key + G on your keyboard. You'll see an overlay appear with various widgets, including the Capture widget that handles all your recording needs. If this is your first time using it, Windows might ask you to confirm whether the application you're using is a game, just check "Yes, this is a game" to proceed.
Setting Up Your Recording Preferences
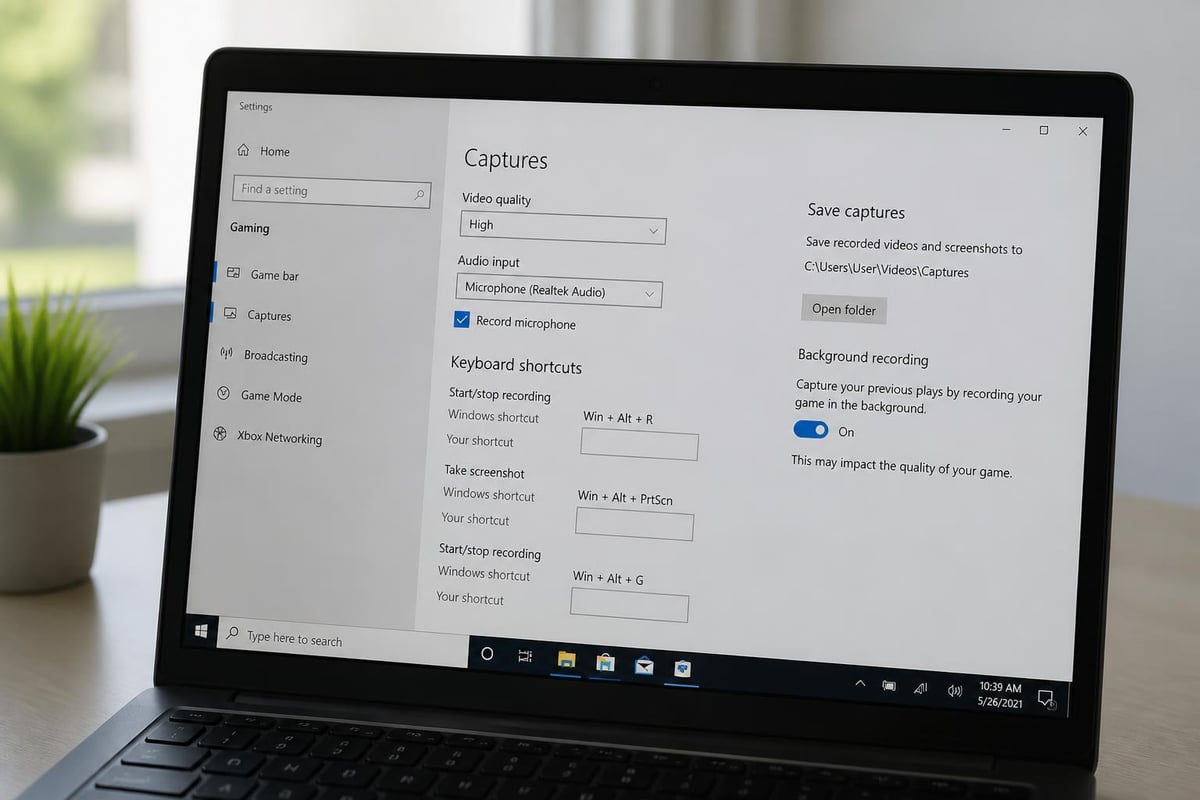
Before you start your first recording, it's worth spending a few minutes adjusting the settings. Click the gear icon in the Xbox Game Bar to access the settings menu, where you can customize:
- Video quality and resolution (up to 1080p at 60fps)
- Audio capture options (system sounds, microphone, or both)
- Keyboard shortcuts for quick access
- Save location for your recordings
- Background recording preferences
The default settings work fine for most people, but if you're planning to create professional content, bumping up the video quality and adjusting the bitrate can make a noticeable difference. Keep in mind that higher quality settings will result in larger file sizes.
Recording Your Screen Step by Step
Once you've got your settings dialed in, actually recording in Windows 10 is surprisingly straightforward. Here's the process from start to finish:
- Open the application you want to record
- Press Windows Key + G to bring up the Xbox Game Bar
- Click the record button (the circle icon) or press Windows Key + Alt + R
- Perform the actions you want to capture
- Stop recording by clicking the stop button or pressing Windows Key + Alt + R again
Your recording will automatically save to your Videos folder in a subfolder called "Captures." The files are saved in MP4 format, which is compatible with pretty much every video player and editing software out there.
Capturing Audio Effectively
Audio quality can make or break your recordings. The Xbox Game Bar gives you control over what audio gets captured. You'll find these options in the audio settings:
- Game audio: Captures all system sounds from the application
- All audio: Records everything playing on your computer
- Microphone: Adds your voice commentary
- Mix control: Adjusts the balance between system and microphone audio
For tutorial videos, you'll typically want both system audio and microphone enabled. If you're recording audio files in Windows 10, make sure your microphone is properly configured in Windows sound settings before you start.
Understanding Xbox Game Bar Limitations
While the Xbox Game Bar is convenient, it's not perfect. Knowing its limitations helps you decide whether it's the right tool for your needs or if you should explore alternatives.
| Feature | Available | Notes |
|---|---|---|
| Record desktop | No | Only records individual applications |
| Webcam overlay | No | Cannot record webcam simultaneously |
| Editing tools | No | Must use separate software |
| Custom watermarks | No | Basic recording only |
| Multiple monitors | Limited | Records active window only |
The most significant limitation is that the Xbox Game Bar can't record your desktop, File Explorer, or certain system windows. It's designed specifically for recording application windows. If you try to use it on your desktop, you'll get an error message saying "There's nothing to record here."
Working Around Common Issues
Sometimes recording in Windows 10 with the Xbox Game Bar doesn't go as smoothly as expected. Here are solutions to the most common problems:
The Xbox Game Bar won't open: Check if it's enabled in your Windows settings. Go to Settings > Gaming > Xbox Game Bar and make sure the toggle is turned on.
No audio in recordings: Verify your audio settings in both the Xbox Game Bar and Windows sound control panel. Sometimes apps need to be actively playing audio before the Game Bar recognizes them.
Poor performance during recording: Lower your recording quality settings or close unnecessary background applications. Screen recording is resource-intensive, especially at higher resolutions.
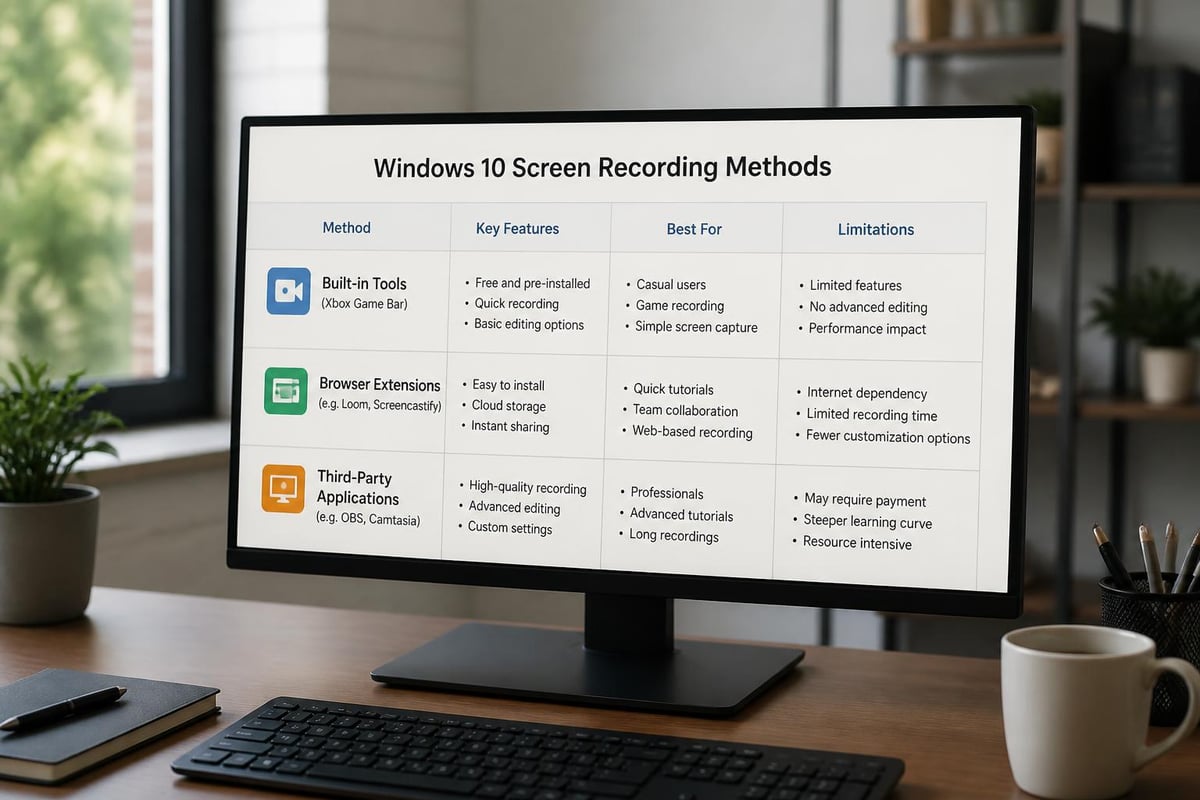
Alternative Recording Methods for Windows 10
If the Xbox Game Bar doesn't meet your needs, plenty of other options exist for recording in Windows 10. Third-party tools often provide more features and flexibility, though they may come with a learning curve or price tag.
Browser-Based Recording Solutions
For those who spend most of their time in a web browser, browser-specific recording tools offer a streamlined alternative. These tools integrate directly into your workflow without requiring separate applications.
Chrome extensions like Mool let you record, share, and review videos directly from your browser, converting screen recordings into searchable knowledge with AI-powered features. This approach works particularly well for teams that need to share knowledge quickly or document processes for training purposes. You can check out free screen capture tools to compare different options.
Professional Recording Software
For more advanced needs, dedicated screen recording software provides features that go well beyond what Windows 10 offers natively. Popular choices in 2026 include:
- OBS Studio: Free, open-source, and incredibly powerful
- Camtasia: Professional editing suite with recording built in
- Snagit: User-friendly with excellent annotation tools
- Bandicam: Lightweight with minimal performance impact
Reviews of the best free screen recorders can help you choose the right tool based on your specific requirements. Each has its own strengths, whether that's streaming capability, editing features, or ease of use.
Advanced Recording Techniques
Once you've mastered the basics of recording in Windows 10, these advanced techniques can elevate the quality and usefulness of your recordings.
Optimizing Recording Performance
Screen recording can be demanding on your system resources. Here's how to ensure smooth recordings without lag or stuttering:
Close unnecessary applications before you start recording. Every program running in the background consumes CPU, RAM, and potentially GPU resources that could be used for smoother recording.
Adjust your recording resolution to match your actual needs. If you're just documenting a bug for your IT department, 720p might be perfectly adequate and will save significant processing power compared to 1080p.
Use an SSD for saving recordings if possible. Writing large video files to a traditional hard drive can create bottlenecks that affect recording quality.
Recording Multiple Monitors
Windows 10's native tools have limitations when it comes to recording across multiple monitors, but workarounds exist. The Xbox Game Bar will only capture the window you're actively recording, regardless of which monitor it's on.
For true multi-monitor recording, you'll need third-party software. Most professional screen recorders let you:
- Choose specific monitors to record
- Record all monitors simultaneously
- Switch between monitors during recording
- Set different quality settings per monitor
This functionality is crucial for workflows that span multiple displays, like coding tutorials where you might show documentation on one screen and your IDE on another.
Organizing and Managing Your Recordings
Creating recordings is only half the battle. Effectively managing and organizing your video files ensures you can actually find and use them when needed.
File Management Best Practices
By default, Windows stores recordings in the Videos\Captures folder, but you can change this location in the Xbox Game Bar settings. Consider creating a dedicated folder structure:
Videos/
  Screen Recordings/
    2026/
      01-January/
      02-February/
    Projects/
      Tutorial Series/
      Bug Reports/
      Team Demos/
Naming your files descriptively right after recording saves tons of time later. Instead of "Desktop 2026-05-23 14-32-15.mp4," use something like "Excel-Pivot-Table-Tutorial-2026-05-23.mp4."
Sharing Recorded Videos
Once you've captured your screen, you'll likely need to share it with others. Windows 10 doesn't include built-in sharing features for recordings, so you'll need to use external services or platforms.
For quick sharing, you might:
- Upload to cloud storage (OneDrive, Google Drive, Dropbox)
- Email directly (if the file size is manageable)
- Use video hosting (YouTube, Vimeo)
- Share via team platforms (Slack, Microsoft Teams)
Some screen capture solutions for Windows 10 include integrated sharing features, making it easier to distribute your recordings without manual uploads.
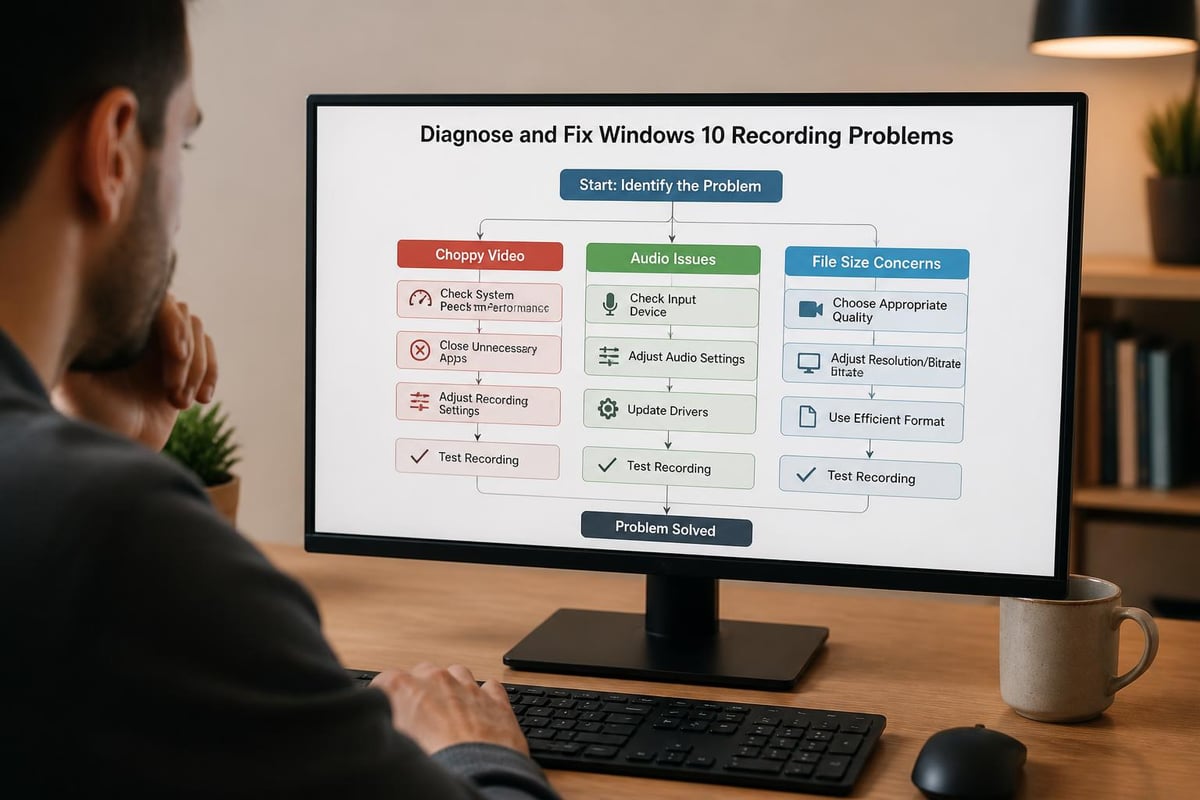
Troubleshooting Recording Quality Issues
Even when everything seems configured correctly, you might encounter quality problems with your recordings. Let's address the most common issues and their solutions.
Fixing Choppy or Laggy Recordings
If your recordings look stuttery or choppy, several factors could be at play:
| Issue | Cause | Solution |
|---|---|---|
| Frame drops | Insufficient GPU power | Lower recording resolution or frame rate |
| Stuttering | CPU overload | Close background apps, disable overlays |
| Lag spikes | Disk write speed | Record to SSD instead of HDD |
| Inconsistent quality | Variable bitrate | Use constant bitrate in settings |
The step-by-step guides for Windows 10 screen recording often include specific troubleshooting sections that can help diagnose performance problems specific to your hardware configuration.
Improving Audio Clarity
Muddy or unclear audio can ruin an otherwise perfect recording. Here's how to get crystal-clear sound:
Position your microphone correctly: Keep it 6-8 inches from your mouth and slightly to the side to avoid plosives (those harsh "p" and "b" sounds).
Reduce background noise: Record in a quiet environment, close windows, turn off fans, and silence notifications on all devices.
Adjust input levels: Set your microphone volume in Windows sound settings so it peaks around 75-80% during normal speaking. Too low and you'll have noise, too high and you'll get distortion.
Use noise suppression: Windows 10 includes some basic noise reduction features in the sound control panel. Enable these for cleaner recordings, especially in less-than-ideal environments.
Keyboard Shortcuts for Efficient Recording
Mastering keyboard shortcuts makes recording in Windows 10 much faster and more seamless. You won't have to fumble with your mouse to start or stop recordings, which keeps your captures looking professional.
Essential Xbox Game Bar Shortcuts
Here are the keyboard combinations you should memorize:
- Windows + G: Open Xbox Game Bar
- Windows + Alt + R: Start/stop recording
- Windows + Alt + G: Record the last 30 seconds (background recording must be enabled)
- Windows + Alt + M: Toggle microphone on/off during recording
- Windows + Alt + PrtScn: Take a screenshot
The "record that" feature (Windows + Alt + G) is particularly useful for capturing unexpected moments. It continuously records in the background and saves the last 30 seconds when you press the shortcut. This works great for gaming, but you can also use it to capture bugs that happen randomly or preserve spontaneous demonstrations.
Customizing Your Shortcuts
Don't like the default shortcuts? You can change them in the Xbox Game Bar settings. Navigate to Settings > Gaming > Xbox Game Bar > Shortcuts and remap any command to whatever key combination feels natural to you.
Just avoid combinations that conflict with other programs you use frequently. For example, if you're recording in Windows 10 while using video editing software, make sure your recording shortcuts don't overlap with editing shortcuts.
Recording Specific Applications and Scenarios
Different types of content require different recording approaches. Let's look at how to optimize recording in Windows 10 for common scenarios.
Recording Presentations and Tutorials
When creating educational content or training materials, clarity and reliability matter most. For presentations, you'll want to:
- Test your recording setup before the actual presentation
- Use a wired internet connection if showing web content
- Close distracting notifications and set your status to "Do Not Disturb"
- Prepare a script or outline to minimize mistakes and re-recordings
- Do a quick audio check to ensure your microphone works properly
Tutorials benefit from higher resolution recordings since viewers often need to see specific details like menu items or small text. According to comprehensive guides on recording applications in Windows 10, setting your recording to 1080p at 30fps provides a good balance between quality and file size.
Capturing Gameplay and Streaming Content
The Xbox Game Bar was originally built for gamers, so it excels at recording gameplay. However, streaming content from services like Netflix or YouTube can be tricky due to digital rights management (DRM) protection.
For gameplay recording:
- Enable background recording to capture spontaneous moments
- Use game mode in Windows settings for better performance
- Monitor your frame rate to ensure smooth recordings
- Record at the same resolution you're playing at
For streaming content, many services block screen recording entirely. You'll see a black screen in your recording where the video should be. This is intentional and there's no legitimate workaround using standard recording tools.
Making the Most of Your Recordings
Creating the recording is just the first step. Getting value from those videos requires effective use, distribution, and potentially editing.
Basic Editing Options
While the Xbox Game Bar doesn't include editing features, Windows 10 comes with the Photos app that has basic video editing capabilities. You can:
- Trim the beginning and end of recordings
- Add text overlays and titles
- Apply basic filters
- Combine multiple clips
- Add background music
For anything more sophisticated, you'll need dedicated video editing software. Free options like DaVinci Resolve or paid tools like Adobe Premiere provide professional-grade editing capabilities.
Converting Recordings for Different Platforms
The MP4 files created by recording in Windows 10 work on most platforms, but you might occasionally need to convert them. Different situations call for different formats:
| Platform | Recommended Format | Notes |
|---|---|---|
| YouTube | MP4 (H.264) | Native format, no conversion needed |
| Social Media | MP4 (smaller bitrate) | Compress to reduce upload time |
| MP4 (highly compressed) | Keep under 25MB for most email services | |
| Professional Editing | MOV or MP4 | Maintain highest quality |
Free tools like HandBrake make format conversion simple. Just drag and drop your recording, choose a preset, and let it process.
Recording Security and Privacy Considerations
When recording in Windows 10, it's important to think about what sensitive information might appear in your recordings and who will have access to them.
Protecting Sensitive Information
Before you hit record, consider what's visible on your screen:
Close private emails and messages that might contain confidential information. Even if you're recording a specific application, notifications can pop up and appear in your recording.
Hide personal bookmarks and browsing history if you'll be showing a web browser. You might be surprised what accidentally appears in the background.
Use incognito mode when recording browser activity to prevent personal accounts and saved passwords from being visible.
Check your desktop background and taskbar for anything you wouldn't want others to see. Icons, file names, and running applications all appear in recordings.
Sharing Recordings Safely
When distributing your recordings, particularly for work purposes:
- Use password protection when available
- Set expiration dates for shared links
- Track who accesses your recordings when possible
- Store recordings securely with encryption if they contain sensitive data
For detailed walkthroughs on using Windows 10's recording capabilities safely, comprehensive guides covering screen recording features often include sections on privacy and security best practices.
Recording in Windows 10 doesn't have to be complicated, whether you're using the built-in Xbox Game Bar for quick captures or exploring more advanced third-party solutions. By understanding the tools available and following the techniques we've covered, you'll be creating high-quality screen recordings that effectively communicate your message.
If you need more powerful features like AI-powered searchable transcripts, instant sharing, and annotation tools, Mool transforms your browser into a complete recording and knowledge management solution. It's particularly useful for teams who want to turn screen recordings into searchable, shareable resources without the hassle of separate applications.